You might ask how on earth we got those stumps out? I saw a video showing how to take out brush and small trees with a post-hole digger - which is basically a heavy metal bar with a blade on the end. We tried it and we can take out a tree in a fairly short amount of time. Well, for smaller trees. We took down one with a diameter of 9" today and that was a real workout. When we took out a tree the size shown in the video below we didn't dig around it at all, but we don't have rocks to deal with either.
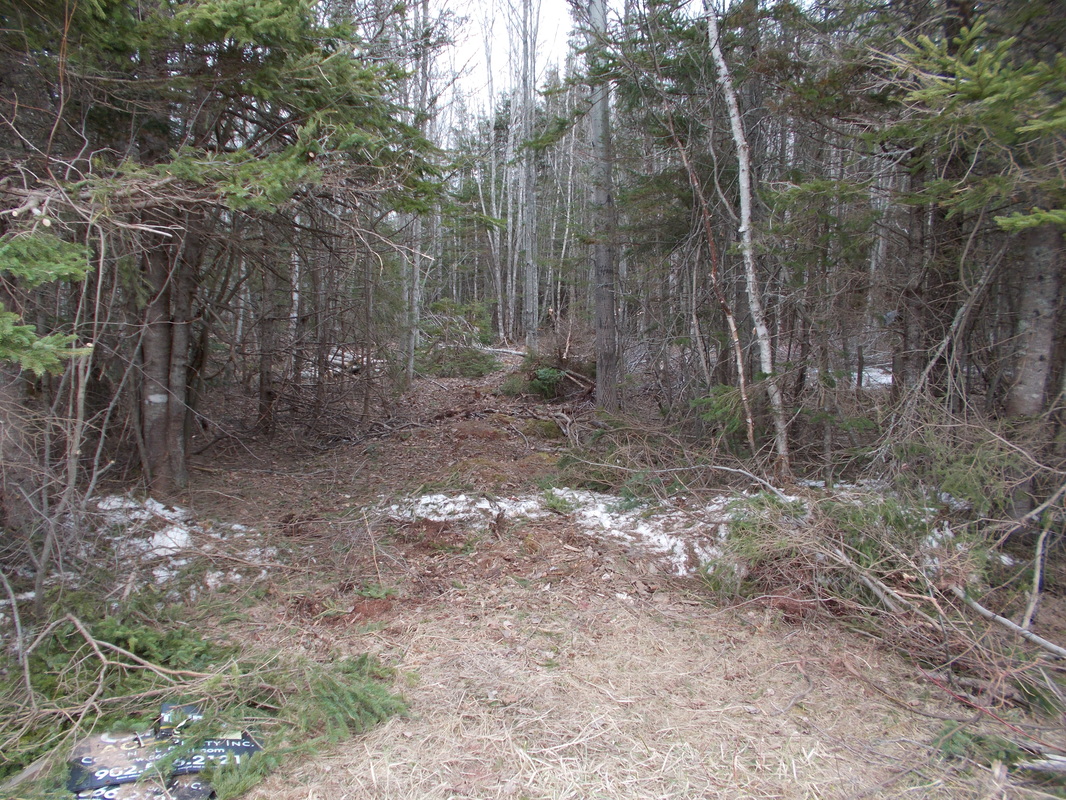
I really love trees, but my practical side says that we really can't park on the road year-round, so we are taking out trees to make a driveway to our new homestead. We don't want stumps in the middle of the road so we have taken these trees out roots and all.
You might ask how on earth we got those stumps out? I saw a video showing how to take out brush and small trees with a post-hole digger - which is basically a heavy metal bar with a blade on the end. We tried it and we can take out a tree in a fairly short amount of time. Well, for smaller trees. We took down one with a diameter of 9" today and that was a real workout. When we took out a tree the size shown in the video below we didn't dig around it at all, but we don't have rocks to deal with either.
0 Comments
I finished up my final piece for the art swap. To read more about the other pieces I created you can read this post. After drawing the picture with ink, I thought it just didn't have enough punch, so I took out my pencil crayons and started adding colour.
Today the weatherman predicted a blizzard which means our island basically shuts down. I live right on the Trans-Canada highway which is usually plowed frequently. Today it hasn't been plowed at all from morning until noon when the first plow when past.
Some of my friends lose power and so have to plan ahead, but I usually have found that we are in a fortuitous location and I have the luxury of baking on storm days without worrying about losing power. I signed up for an art swap organized by one of my friends. I agreed to create three pieces of art and mail them out by a certain date.
Before I could even begin on my pieces, I had to work on another (secret) project with a deadline. That means that I didn't even begin until 7 days before the deadline... I know, I know. It sounds like procrastination, leaving things to the last minute etc. I decided to use the recipient's initial for their first name and create a personalized piece of art for each one. Almost six years ago we moved from Alberta and sold our farm, but we knew we wanted to farm again. And I think this is the year we begin to realize that dream.
Between Christmas and New Years Day, we found a piece of land for sale - 15 acres of woodland with a stream running through it. (You can see the property outlined in teal on the map.) But the best part is the asking price; it is only $14,900! January 6th: we got a call from the bank to let us know we are pre-approved for that amount. Now we can move forward and make an offer. Ok, so I was always the kid who liked to read and hated gym. My teachers didn't fuss too much and I was always in the middle (left-out) section of kids who behaved, but didn't excel.
Testing for Acids & BasesDear Daughter is learning about acids and bases in science. Her textbook suggests various experiments using litmus paper (which if you can remember back to grade 6 will show whether a substance is an acid or base by turning either blue or red depending on the paper used).
We LOVE experiments in our house so I duly set off in search of litmus paper (also called pH paper). None of the drug stores that I visited had it (actually some didn't even know what I was talking about). So we dug deeper... Did you know that Litmus paper is made using chemicals found in purple cabbage?! So we stopped at our local organic vegetable stand at the Farmer's Market and bought a purple cabbage for $3.00 Daughter chopped up two cabbage leaves. My daughter came to me with a little hole in her favourite shirt. It was right in front and any attempt to mend it would be quite obvious.
So I decided to first darn it with a complimentary thread. This closed up the hole. Then I sewed a head, legs and a pair of fairy wings. It is so tiny that I didn't bother with any facial features. We live in an old house. I think it was built around 1885 and it has seen a lot of wear and tear over the years. We have been slowly renovating as the money is available. (We believe in only spending cash on hand for renovations and not racking up credit cards, so it is pretty slow going.) The first year we lived here, I fixed the cracks and painted the walls in my kid's bedrooms. My daughter's room went from this: to this (we are still planning to redo the molding): And my son's room went from this: to this: We then had to seriously fix the roof and inside renovations got put on hold. Fortunately we found a metal roofing company who would roof our house in stages so we could afford it. (The back of the house still needs to be finished.) I fixed and painted up one downstairs room (it should be the living room) and it became my store. We moved our bathroom from under the stairs (yes, you heard that correctly) to an empty room without purpose. It's nearly done - YAY! Now I can fix upstairs again. I began working on the hallway and filled in the cracks with drywall mud (it's actually called Drywall Compound). Then it had to dry overnight. Once the mud turns from grey to white you know it's dry. Then I used some 100 grit sandpaper wrapped around a block of wood to sand it smooth. There were some really huge places where the plaster had fallen off the wall and I had to re-mud those areas. I use an old bed sheet to catch most of the drywall dust that I sand off the wall because apparently it will harm a vacuum cleaner to suck up drywall dust. I think my dad told me once that the dust is so fine that it goes right through the filter into the motor, but I might be wrong - it was a long time ago. I painted some primer over the area I had worked on, just to see if I had missed any cracks or dents in the wall because it is really hard to see the parts that have been worked on after a while with patchy white plaster showing through the pale peach walls layered with white drywall mud. Now it is all patchy-white, but I could see the holes again. I re-mudded those bits and will sand the mud smooth today. Here's a hint for anyone working with drywall mud: sand the wall as soon as the mud has turned white and is dry. If you wait a long time, your sanding time will be longer because the mud will be harder. I like to work as efficiently and easily as possible so I mud on the first day, and sand on the second day (except if the mud is still grey then I go around the grey areas).
I manage to weed my vegetable patch once a week which keeps the big weeds down. Today is weeding day. I noticed a clump of Lamb's Quarters (a weed) in the beans. I didn't pull it up though. I think we'll have some for supper tonight. Every time I see lamb's quarters, I think back to my childhood to a time when that was the only green we ate for a time. I grew up half a world away in South Africa and most of my childhood was spent during a 10-year drought. As a farmer's daughter, I knew exactly what the impact of a drought was. We grew all our food, but there was no water to spare on the vegetable garden so nothing grew very well. The only thing that grew really well was the weeds. Picking weeds under the broiling sun was not a chore anyone was eager to do so we had to weed either early in the morning or late in the afternoon. Then one day as the sun was sinking my mom's employee casually pointed out that we could eat "umfino". The next day she showed her how to cook up lamb's quarters in mashed potatoes like spinach. It really is delicious! 1. Peel and cube potatoes (about 1" cubes are fine) 2. Place potatoes into a pot suitable for mashing - I use my biggest pot - and pour in some water so that the water level is half-way up the potatoes. 3. Rip the leaves off the thicker stalks (the thinner stalks are fine to put in), wash them and lay them on top of the potatoes. 4. Cover the potatoes and boil on medium-high until soft - about 15 to 20 min. The leaves will have wilted by now. Keep an eye on your cooking so that you don't burn your potatoes. 5. Mash the potatoes with some butter (or margarine) and milk to make it super creamy. This recipe can make as little or as much as you wish. As a rule of thumb I usually prepare one medium potato per person. Young, tender plants are tastier than older plants about to go to seed. Of course don't use weeds that have been sprayed with poisons! Edible Wild Food has a page on identifying lamb's quarters: http://www.ediblewildfood.com/lambs-quarters.aspx
|
AuthorJulie is a Mom working from home. She runs her own yarn business, homeschools her two kids, and gardens in her spare time. Archives
August 2015
Categories
All
|